Salted Egg Squid Recipe: How to Achieve Crispy Calamari
Prep time: 25 minutes
Cook time: 20 minutes
Servings: 2–3 people
Key Takeaways
- A good salted egg squid recipe depends on balancing two elements: crisp, tender squid and a smooth salted egg sauce that coats lightly without making the squid soggy.
- Drying the squid thoroughly, using a light starch coating, and frying at the right oil temperature are the main steps that determine whether your calamari stays crisp.
- The sauce should be rich and fragrant, with salted egg yolks, butter, garlic, and curry leaves creating the savoury flavour profile associated with zi char salted egg squid.
- This dish works best when the squid is fried and sauced separately, then combined briefly just before serving.
- Starting with fresh squid from a reliable online seafood delivery supplier can make a noticeable difference to texture, tenderness, and overall flavour.
Introduction
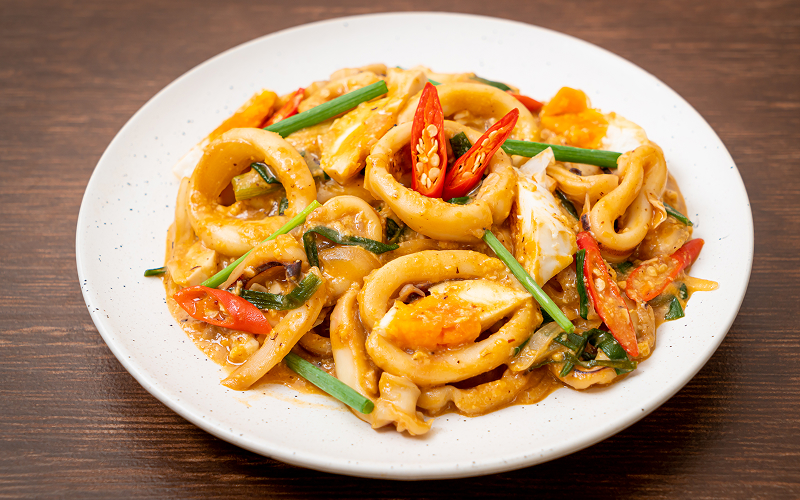
Salted egg squid is one of those dishes that immediately stands out when it reaches the table. The golden coating, the rich aroma of salted egg yolk, and the contrast between the crisp squid and the creamy sauce make it one of the most recognisable seafood dishes at many zi char stalls across Singapore.
What makes this dish so satisfying is not complexity, but precision. A well-executed salted egg squid recipe should deliver lightly crisp calamari that stays tender inside, coated in a sauce that feels rich and savoury without turning greasy or heavy. The ingredient list is relatively straightforward, but the cooking process requires precise control of moisture, heat, and timing.
In this guide, we’ll walk through how to prepare the squid, build the sauce, and bring both components together properly so you can recreate salted egg calamari at home with the texture and flavour that make it so popular.
Ingredients for Salted Egg Squid
For the squid
- 300–400g squid, cleaned and sliced
- 3–4 tbsp cornflour or potato starch
- Salt, to taste
- White pepper, to taste
- Oil for frying
For the salted egg sauce
- 3 salted egg yolks, steamed and mashed
- 2 tbsp butter
- 2 cloves garlic, minced
- 1–2 sprigs curry leaves
- 1–2 bird’s eye chillies, sliced (optional)
- 2–3 tbsp evaporated milk
- Pinch of sugar
Pre-Preparation: Setting Up for Crisp Results
Before you start frying, it helps to get everything ready in advance. This dish comes together quickly once the oil is hot and the sauce starts cooking.
1. Prepare a Light Coating
Use cornflour or potato starch rather than a wet batter. A dry starch coating gives the squid a thinner, lighter crisp layer that works better with salted egg sauce.
Toss the squid just before frying, not too early. If it sits in the starch for too long, moisture from the squid can turn the coating patchy or clumpy.
2. Heat the Oil Properly
The oil should be around 170–180°C. At this temperature, the squid fries quickly and crisps up before it has time to absorb excess oil.
If the oil is too cool, the coating turns greasy and soft. If it is too hot, the exterior browns before the squid cooks evenly.
3. Cook in Small Batches
Avoid overcrowding the pan or fryer. Adding too much squid at once lowers the oil temperature and leads to soggier results.
Small batches also make it easier to remove the squid promptly once it turns a light golden colour.
4. Prep the Sauce Ingredients Beforehand
Because the salted egg sauce comes together quickly, it helps to have the butter, garlic, curry leaves, chilli, evaporated milk, and mashed salted egg yolks measured and ready before you start frying. This reduces the chance of overcooking the squid while you prepare the sauce.
Step-by-Step Salted Egg Squid Recipe
Step 1: Season and Coat the Squid
Lightly season the squid with salt and white pepper. Add the cornflour or potato starch and toss until all pieces are evenly coated.
Shake off any excess starch before frying. You want a thin coating rather than a thick, floury layer.
Step 2: Fry the Squid
Heat the oil over medium-high heat until it reaches about 170–180°C. Fry the squid in small batches for about 1–2 minutes, or until lightly golden and crisp.
Remove immediately and drain on paper towels or a wire rack.
Technique tip: Squid cooks very quickly. Leaving it in the oil too long will make it tough rather than crisp.
Step 3: Let the Squid Rest Briefly
Once fried, let the squid rest for a minute or two while you prepare the sauce. This helps the coating settle and keeps the surface drier before it is tossed in the sauce.
Step 4: Build the Aromatic Base
In a clean pan, melt the butter over medium heat. Add the minced garlic, curry leaves, and sliced chilli if using. Stir until fragrant, and the curry leaves begin to crisp slightly.
This aromatic base is what gives zi char salted egg squid much of its savoury depth and fragrance.
Step 5: Make the Salted Egg Sauce
Add the mashed salted egg yolks to the pan and stir gently into the butter mixture. Pour in the evaporated milk and continue stirring until the sauce becomes creamy and smooth.
Add a small pinch of sugar to round out the yolks’ saltiness.
Technique tip: Keep the heat moderate. If the pan is too hot, the butter can separate, and the sauce may become oily instead of creamy.
Step 6: Toss the Squid in the Sauce
Add the fried squid to the sauce and toss briefly so each piece is lightly coated.
You want the squid coated, not soaked.
Technique tip: Overmixing or leaving the squid in the pan too long will soften the crisp coating.
Step 7: Serve Immediately
Transfer the squid to a serving plate and serve while hot. This is when the contrast between the crisp coating and creamy salted egg sauce is at its best.
Why This Salted Egg Squid Recipe Works
The challenge with any salted egg squid recipe is that the squid and sauce want opposite things. Squid needs high heat and minimal moisture to stay crisp. Salted egg sauce, on the other hand, is creamy, buttery, and designed to cling.
If the squid is under-dried, over-coated, or left sitting in the sauce too long, the crisp exterior softens quickly. If the sauce is too thin or oily, it overwhelms the squid rather than coating it. The key is to treat the dish as two separate preparations first, then combine them at the very end.
When done properly, you get a dish with three distinct textures at once: a light, crisp coating, tender squid beneath it, and a creamy salted-egg layer that adds richness without weighing everything down.
Understanding the Two Key Elements
To get this dish right, it helps to think of the squid and sauce as two separate components before bringing them together.
1. The Squid
The squid should be:
- Crispy on the outside
- Tender and slightly bouncy inside
- Lightly coated rather than thick or doughy
Squid cooks very quickly, which is both an advantage and a risk. It can go from tender to rubbery quickly, so the frying stage needs to be fast and controlled. Starting with fresh, properly handled squid also helps, as firmer squid tends to fry more evenly and hold its texture better. If you prefer not to shop in person, buying seafood online can be a practical way to source fresh squid for dishes like salted egg calamari at home.
2. The Salted Egg Sauce
The salted egg sauce should be:
- Smooth and creamy
- Fragrant with curry leaves, butter, and aromatics
- Rich and savoury without becoming overly oily
The goal is not to drown the squid in sauce, but to create a thin coating that gives the dish its signature salted egg flavour while preserving texture. That contrast with umami is what makes salted egg seafood so addictive in the first place.
Choosing and Preparing the Squid
The quality and condition of your squid will affect the final texture more than many home cooks expect. Even with the right coating and sauce, poorly prepared squid can turn watery or tough.
Fresh vs Frozen Squid
Fresh squid is usually the better option for this recipe because it tends to have a firmer texture and releases less excess moisture during cooking. That matters when you are trying to build a light, crisp coating. If the squid is too wet, the starch coating can turn patchy, and the oil may splatter more during frying.
That said, frozen squid can still work well for a home salted egg squid recipe if it is thawed properly. Defrost it in the fridge, drain away any liquid, and pat it thoroughly dry before seasoning and coating. If the squid still feels damp after thawing, leave it uncovered on paper towels in the fridge for 20 to 30 minutes to remove additional surface moisture.
If you are buying squid specifically for frying, look for pieces that smell clean and mild rather than strongly fishy, with flesh that feels firm rather than soft or mushy. If you prefer not to make a separate market trip, using a reliable delivery service for fresh seafood can also make it easier to source squid for dishes like salted egg calamari while giving you more flexibility to plan the rest of your meal at home.
How to Clean and Cut Squid
If you are starting with whole squid, prepare it by:
- Removing the head, innards, and transparent quill
- Peeling off the outer skin if desired
- Rinsing briefly and drying well
- Slicing the body into rings or bite-sized pieces
- Cutting larger tentacles into manageable portions if using them
Uniform sizing matters. Squid pieces that are too uneven will cook at different rates, leaving some overcooked while others remain pale or soft.
Why Drying Matters So Much
This is one of the most important steps in the entire salted egg squid recipe. Any surface moisture on the squid will interfere with the coating and reduce crispness during frying. Excess moisture can also cause dangerous splattering when it hits hot oil.
After cleaning and cutting the squid, lay the pieces out on paper towels and pat them thoroughly dry. If needed, let them sit uncovered in the fridge for a short while to remove additional surface moisture before coating.
What to Serve with Salted Egg Squid
Salted egg squid is rich, so it works best alongside simpler dishes that balance the meal.
Good pairings include:
- Steamed rice
- Sambal vegetables
- Stir-fried leafy greens
- Light soups
- Plain tofu or egg dishes
If you are planning a fuller zi char-style dinner at home, you can also serve salted egg squid alongside steamed fish, cereal prawns, or sambal seafood dishes for variety.
Recreate This Zi Char Favourite at Home
Starting with good squid also makes the process much easier. Fresher squid tends to be firmer, less watery, and more forgiving during cooking, which helps you achieve a cleaner coating and a better bite once fried. This matters especially for dishes like salted egg squid, where excess moisture can quickly affect crispness.
At Catch of The Day SG, we make it easier to cook seafood dishes like this at home by giving you access to fresh seafood without the extra market run. If you are planning a weeknight seafood dinner or a larger zi char-style spread, our online seafood delivery service helps you source quality squid and other seafood more conveniently, so you can focus on the cooking itself rather than the prep and sourcing.
Shop now and order the seafood you need for your next salted egg squid recipe.
Frequently Asked Questions
What type of squid is best for a salted egg squid recipe?
Medium-sized squid is usually a good choice because it stays tender and is easy to slice into rings or bite-sized pieces. Fresh squid generally gives the best texture, but frozen squid can still work well if thawed properly and dried thoroughly before frying.
Can I make salted egg squid without deep frying?
Yes. You can air-fry or shallow-fry the squid if you prefer a lighter version, though the texture will be slightly different from that of traditional salted egg calamari served at zi char stalls. If using an air fryer, make sure the squid is still lightly coated and cooked in a single layer for better crispiness.
Why did my salted egg squid turn soggy?
This usually happens when the squid is not dried properly before frying, the oil temperature is too low, or the squid is left in the sauce for too long. To keep the squid crisp, fry in small batches, make sure the coating is dry and light, and toss the squid in the sauce only just before serving.
Can I prepare the salted egg sauce in advance?
You can prepare the salted egg yolks and aromatics in advance, but the sauce itself is best made fresh. Since the dish depends on a contrast between crisp squid and warm creamy sauce, it works best when the sauce is cooked just before serving.
What can I serve with salted egg squid?
Steamed rice, stir-fried greens, sambal vegetables, and light soups all pair well with salted egg squid because they balance its richness. If you are building a larger seafood meal, it also goes well with other zi char-style dishes such as steamed fish or cereal prawns.